I’ve been around long enough to know life moves in cycles.
Things that were new and exciting one day eventually become dull and boring the next. The pursuit of shiny objects and interesting paths quickly fall by the wayside before you realize it. We move from one thing to the next and then another in search of a quick thrill, because we’ve become instant gratification junkies.
What if, instead, we intentionally slowed our lives down? What if we deliberately chose to look at the world in wonder like we did when we were young? What if we took time out to play like we did when we were children? What if we stopped to listen to what’s going on inside instead of burying our faces in smart devices that make us dumb?
We spend our adult lives working, chasing dreams, and running after material possessions we think will make us happy. But let me ask you; in all of your pursuits, are you truly content?
Is your soul really at peace?
If there’s any hint of hesitation in your answer, it might be time to step back, take a look at the bigger picture, and find what really fulfills you.
Your time on this pale blue dot is finite. It would be a tragic waste to get to the end and say “I wish I could have…” Maybe today should be the day you stop spinning cycles on unnecessary things that don’t matter.
I passed the Salesforce ADM201 certification exam today. It’s been a five-year road to get here. From the first week I began working with Salesforce, I decided attaining certification was something I wanted to pursue.
Now that I’ve done it, I thought it might be good to share the things that helped me be successful with those looking to do the same.
Know Your Stuff
Your success or failure pretty much boils down to this… You’ve got to know your stuff or it’s never going to happen.
The Salesforce ADM201 certification exam is not a walk in the park. You’ll never pass it by just reading the online help, or taking online practice tests and studying flash cards — most of which are badly outdated, or just plain wrong.
You’re going to need to be familiar with just about every area of Salesforce and how it actually works — where and how you can do something, and where and why you can’t do something else.
This means getting a developer org and configuring it just like you would if you were doing it for your day job or a client. Be creative in your approach. Try doing things you’ve never done. Try to break it. Enter real data and learn how it flows through the system from a Campaign to a converted Lead to a resolved Case.
Learn it, live it, be it…
Do everything in your power to wrap your head around the big picture of what Salesforce does and totally understand it. That’s what being a good admin is all about anyway — knowing what can or can’t be done.
Study With a Group
I can’t stress this one enough.
My employer was kind enough to purchase a year of Premiere Plus Support in order to provide me the online courses to pursue certification, and I did all 60+ hours of both the ADM201 and DEV401 trainings. I learned a lot from it, but it wasn’t until I joined a study group that the learning really sank in.
Collaborating with a group of your peers introduces fresh ideas, which could give you a completely different perspective about a topic. That, in turn, leads to other moments of discovery. If you’re serious about earning a certification, I suggest you find others who are as committed as you to passing your exam.
I joined the Salesforce Certification Study Group1 in the Salesforce Success Community. Deepa Patel and the others who volunteer with the group have worked hard to develop a successful curriculum with a high passing rate for those who are committed enough to make it to the end. It doesn’t cost any more than your time and effort, plus the $200 to register for your Salesforce ADM201 certification exam, which you’re going to spend anyway.
Once you’re accepted into the private group, watch what goes on in the Chatter feed for a while, then when signups for the next round of sessions are announced, join the one that best suits your geographical region.
Make the Time
Okay. You’ve been accepted into the study group. But if you aren’t totally serious about earning your certification, you’ll never be successful. Period. You’ve got to want it to happen. If you don’t give studying the attention it needs, you can forget about passing, and may as well stop reading now.
Make it what you think about when you’re sitting in traffic, brushing your teeth, or taking a shower. Turn off the TV for a couple hours each night and learn something new about Salesforce instead. Choose to become obsessed for a while.
If you end up joining the certification study group, make time to do the work you’re supposed to do before the next session — every single week. Commit to the 15 weeks the group is going to require from you. Be ready to demo your work for the online sessions. Know exactly what you did, why you did it, and have a reason for it. I promise you’ll learn incredible amounts if you commit to working this way.
Be Real with Yourself
Be 100% honest with yourself. Ask yourself “Am I really ready to pursue certification?” If you’ve only been working with Salesforce a few months, it’s going to be a tough row to hoe, even with the help and support of a study group — who may not be too keen helping you along while studying themselves.
Being part of a group requires commitment. People are depending on you to have ideas that could be different than theirs. Are you really ready to commit to a group of 6–12 people for 15 weeks, and collaborate with them? Are you really ready to do 5 to 8 hours of homework each week? It’s going to take serious sacrifice.
If you’re not ready, then wait until you are. You have a better chance of succeeding if you do. By joining the study group without enough experience, chances are you’ll fall behind fast, which is going to discourage you. Don’t set yourself up to fail. Be ready.
Use Good Resources
I mentioned the online tests and flash cards earlier. Don’t rely on them at all. Salesforce adds lots of new features at each release. Flash cards and tests from the Spring ’11 release are full of misinformation now. If you rely on them to know your stuff, you might not know much at all.
There is one good resource I’ll personally endorse, and that’s John Coppedge’s Certified On Demand.
I joined while John was developing the site, but would have no hesitation spending the $40 lifetime membership that he’s asking for now. It’s a good resource that’s kept current. The questions he’s developed are quite similar to the real test (but not actual questions, and are just a little easier).
Consider supporting John’s efforts and buying a lifetime membership. Use Certified On Demand as a supplement to studying with the Salesforce Certification Study Group. It helped me be confident I was ready when I started doubting myself.
The only other resource you need now is to watch the Dreamforce Get Started on the Certified Administrator Credential2 workshop video. It provides solid advice for being ready, how to take the Salesforce ADM201 certification exam, and knowing what you’re walking into.
Taking Your Exam
You’ve scheduled your test, and now it’s time to go take it.
There’s only one thing to be said… Know that you know what you know. If you’ve worked hard in the Salesforce Certification Study Group, you’re ready to pass. Walk into the exam knowing that fact.
When you sit down to begin, take a minute to breathe and relax. Then start your exam using the techniques you learned from the workshop video. Before you know it, you’ll be waking out of the testing center as a Salesforce Certified Administrator.
I had the need to select several folders at once in the Mac OS Finder and zip them up as individual archives. This AppleScript to compress files and folders was the solution I came up with.
The script compresses each item selected into its own archive, and works with both folders and files.
tell application "Finder"set theList to selection
repeatwith i from1to (count of theList)
set theItem to (item i of theList) as alias
set itemPath to quoted form of POSIX pathof theItem
set fileName tonameof theItem
set theFolder to POSIX pathof (container of theItem as alias)
set zipFile to quoted form of (theFolder & fileName &".zip")
do shell script "zip -jr "& zipFile &" "& itemPath
endrepeatendtell
I was asked to find a solution for our field reps that would simplify the process of adding a completed task to their activities when they visited one of our retail stores.
We keep our retail locations in Salesforce.com as contacts under a master account, which is shared with all users using a special account sharing rule.
The solution I came up with was a simple flow that limited users to a specific set of enterable information, pre-filling the date of the activity, and marking the task complete when the activity was committed. Literally, the only thing they needed to do was select a picklist value and enter a comment about their visit. It was exactly what we were looking for.
The thing I didn’t like about the flow was that when a user entered it, context kind of got lost – meaning they started out from a contact record, but didn’t have a good visual cue about where they were once they got into the flow.
Sure, the flow was simple, but to me it’s still poor UX not to know the context of your work at all times. So, I decided to use a Visualforce page to solve the problem:
<apex:pagestandardController="Contact">
<apex:sectionheadertitle="Add Retail Store Visit"subtitle="{!Contact.Name}"></apex:sectionheader>
<flow:interviewname="Retail_Store_Visit">
<apex:paramname="vContact"value="{!Contact.Id}"></apex:param>
<apex:paramname="vAccount"value="{!Contact.Account.Id}"></apex:param>
</flow:interview>
</apex:page>
The trouble with this was that after the flow data was committed, the user would be returned to the beginning of the flow. That’s definitely not what I wanted. I needed to go back to the contact record I started from.
So I added the finishLocation attribute to the <flow:interview /> component tag. It would make sense that if I passed the Contact Id, the flow should return to the Contact record:
Nope. That didn’t do it. When the flow is entered, context gets lost, so Salesforce doesn’t really know where the user is anymore. Even using the vContact Apex parameter didn’t work.
I searched help documentation for an answer, but it wasn’t all that helpful. I searched Communities and came up empty. Then I searched the Salesforce Stack Exchange, where the only solution I could find was really convoluted, and didn’t even come close to solving my problem. I was vexed.
Taking a break to get a cup of coffee, a solution dawned on me that turned out to be pretty darned simple. All I needed was an Apex variable in the page, which I could pass to the finishLocation component tag once the flow was complete. Oddly enough, this method is not documented – at least not that I could find.
Using the Apex variable, users where returned to the contact record they started from, and could see the task they just added in the activity history related list. This was exactly what I was looking for. Everyone was happy.
If you need to return to a starting point when using flows and Visualforce pages, consider giving this solution a try.
I’ve been working on a force.com app with the requirement that a user must enter a valid email address on a Visualforce page before being able to save a record.
But they must also be able to insert the related contact’s email address by clicking a button instead of having to leave the edit page to go find it. That seemed simple enough, but it wasn’t. This is my solution for making a field appear required on a Visualforce page.
In my original Visualforce page, it seemed logical that if I set the recipient email field as required, all would work as expected. However, defining the field as required prevented my custom action in my page controller from firing and entering the email address.
Original Page Controller
publicclassGiftCardTestController{private ApexPages.StandardController std;public String cEmail {get;set;}public Gift_Card_Order__c gc {get;set;}publicGiftCardTestController(ApexPages.StandardController stdCtrl){
std = stdCtrl;}//selects the email address of the related contact
//and inserts into recipient email field.
publicvoidfillEmail(){
gc =(Gift_Card_Order__c)std.getRecord();
cEmail =[select Id, Email from Contact where Id =:gc.Contact__c].Email;
gc.Recipient_Email__c= cEmail;}}
In this example, the fillEmail() action should select the related contact email address, and put the value in the Recipient_Email__c field so the user can see it.
But it’s not that simple it seems. When the field had the required=“true” attribute set, the action would not fire because all validation is done on the client side and the page never posts back to the server — so the controller action never gets called.
So after some digging and asking for help on the Salesforce discussion boards, the solution was to make the Recipient_Email__c appear as if it’s required on the page (though it’s really not), and add a new save method to my controller to handle field validation on the server side when the record gets saved.
New Page Controller
publicclassGiftCardTestController{private ApexPages.StandardController std;public String cEmail {get;set;}public Gift_Card_Order__c gc {get;set;}publicGiftCardTestController(ApexPages.StandardController stdCtrl){
std = stdCtrl;}publicvoidfillEmail(){
gc =(Gift_Card_Order__c)std.getRecord();
cEmail =[select Id, Email from Contact where Id =:gc.Contact__c].Email;
gc.Recipient_Email__c= cEmail;}// add custom save method...
public pageReference save(){
gc =(Gift_Card_Order__c)std.getRecord();// if the recipient email is null, add an error to the field
// and return null to remain on the current page...
if(gc.Recipient_Email__c==null){
gc.Recipient_Email__c.addError('A valid email address is required.');returnnull;}// otherwise, the field is filled, so it's okay to redirect to view page.
// standard field validation will check for valid email format.
else{return std.save();}}}
Notice the <apex:pageblocksectionitem /> code to replace the original field. This is how we make the field appear with the “required” bar. A nifty trick that took some digging to discover. Hopefully, this post saves someone else the time it took me to figure it out — and me the time when I forget it.
For convenience, here’s a Github Gist with field label & inline help that shows exactly how to make a field appear required on a Visualforce page.
I had the need to add a bunch of named text files to a folder in the Finder on my Mac today.
I found it a pain to open BBEdit, make a new document, save it to where I wanted it, and then manually copy & rename the file back in the Finder. A lot of effort just to get 7 or 8 empty files with different names.
So, I threw together this little AppleScript to add empty files instead. The gist is once launched in the Finder (using FastScripts by Red Sweater naturally. Keystroke: cmd+option+shift+N), a dialog pops up that lets you enter a file title. Then the Finder creates that file in the front-most window. If no window is open, the file is added to your Desktop.
I found this to be more than twice as fast as the “traditional” method of making several files. Hopefully, it can help you out too. Remember, use it with FastScripts for quick keystroke access. Save as a script in the “Finder” scripts folder (“~/Library/Scripts/Applications/Finder/”).
property defaultFileName : "newFile.txt"tellmeto activate
set theFileName totext returnedof (display dialog "Enter a file name:" default answer defaultFileName)
tell application "Finder"
activate
if the (count of windows) is not0thenset theFolder to (folder of the front window) as textset theFolder to POSIX pathof theFolder
elseset theFolder to POSIX pathof (get path to desktop)
endifset addedFile to (theFolder & theFileName)
do shell script "touch '"& addedFile &"'"if the (count of windows) is not0thenset addedFile to (POSIX file addedFile) as alias
select addedFile
endifendtell
Here’s an AppleScript I use to quickly toggle desktop visibility for taking screenshots and recording screencasts that I thought might be useful for others.
Copy the source and paste the code into AppleScript Editor, or your editor of choice, compile and save. As always, scripts like this work best using FastScripts from Red Sweater Software.
tell application "System Events"set frontMostApp tonameof the first process whose frontmostistrueendtelltryset theDefault to ((do shell script "defaults read com.apple.finder CreateDesktop") as integer) as boolean
onerror-- if the default value doesn't already exist, create it.
do shell script "defaults write com.apple.finder CreateDesktop 1"set theDefault to ((do shell script "defaults read com.apple.finder CreateDesktop") as integer) as boolean
endtry
do shell script "defaults write com.apple.finder CreateDesktop "& (((not theDefault) as integer) as string)
tell application "Finder"to quit
delay 1tell application "Finder"to launch
tell application frontMostApp to activate
Note: This single script turns off the desktop if it’s on, and turns it on if it’s off - just to clear up the question if asked.
Some time ago, I set up my Gmail account in Apple Mail to copy over messages which were not sent to my jimmitchell.org account. I’m one of those guys who likes to have everything all in one place at my fingertips when I need it.
After copying over the messages I wanted, I completely removed the Gmail IMAP account from Mail and went about my business. Soon after, when I went searching for a specific email, I experienced the phenomenon of ghost emails in the search results.
These are messages that Mail once knew about, but no longer knows where they exist. The ghost emails were all from the since removed Gmail account.
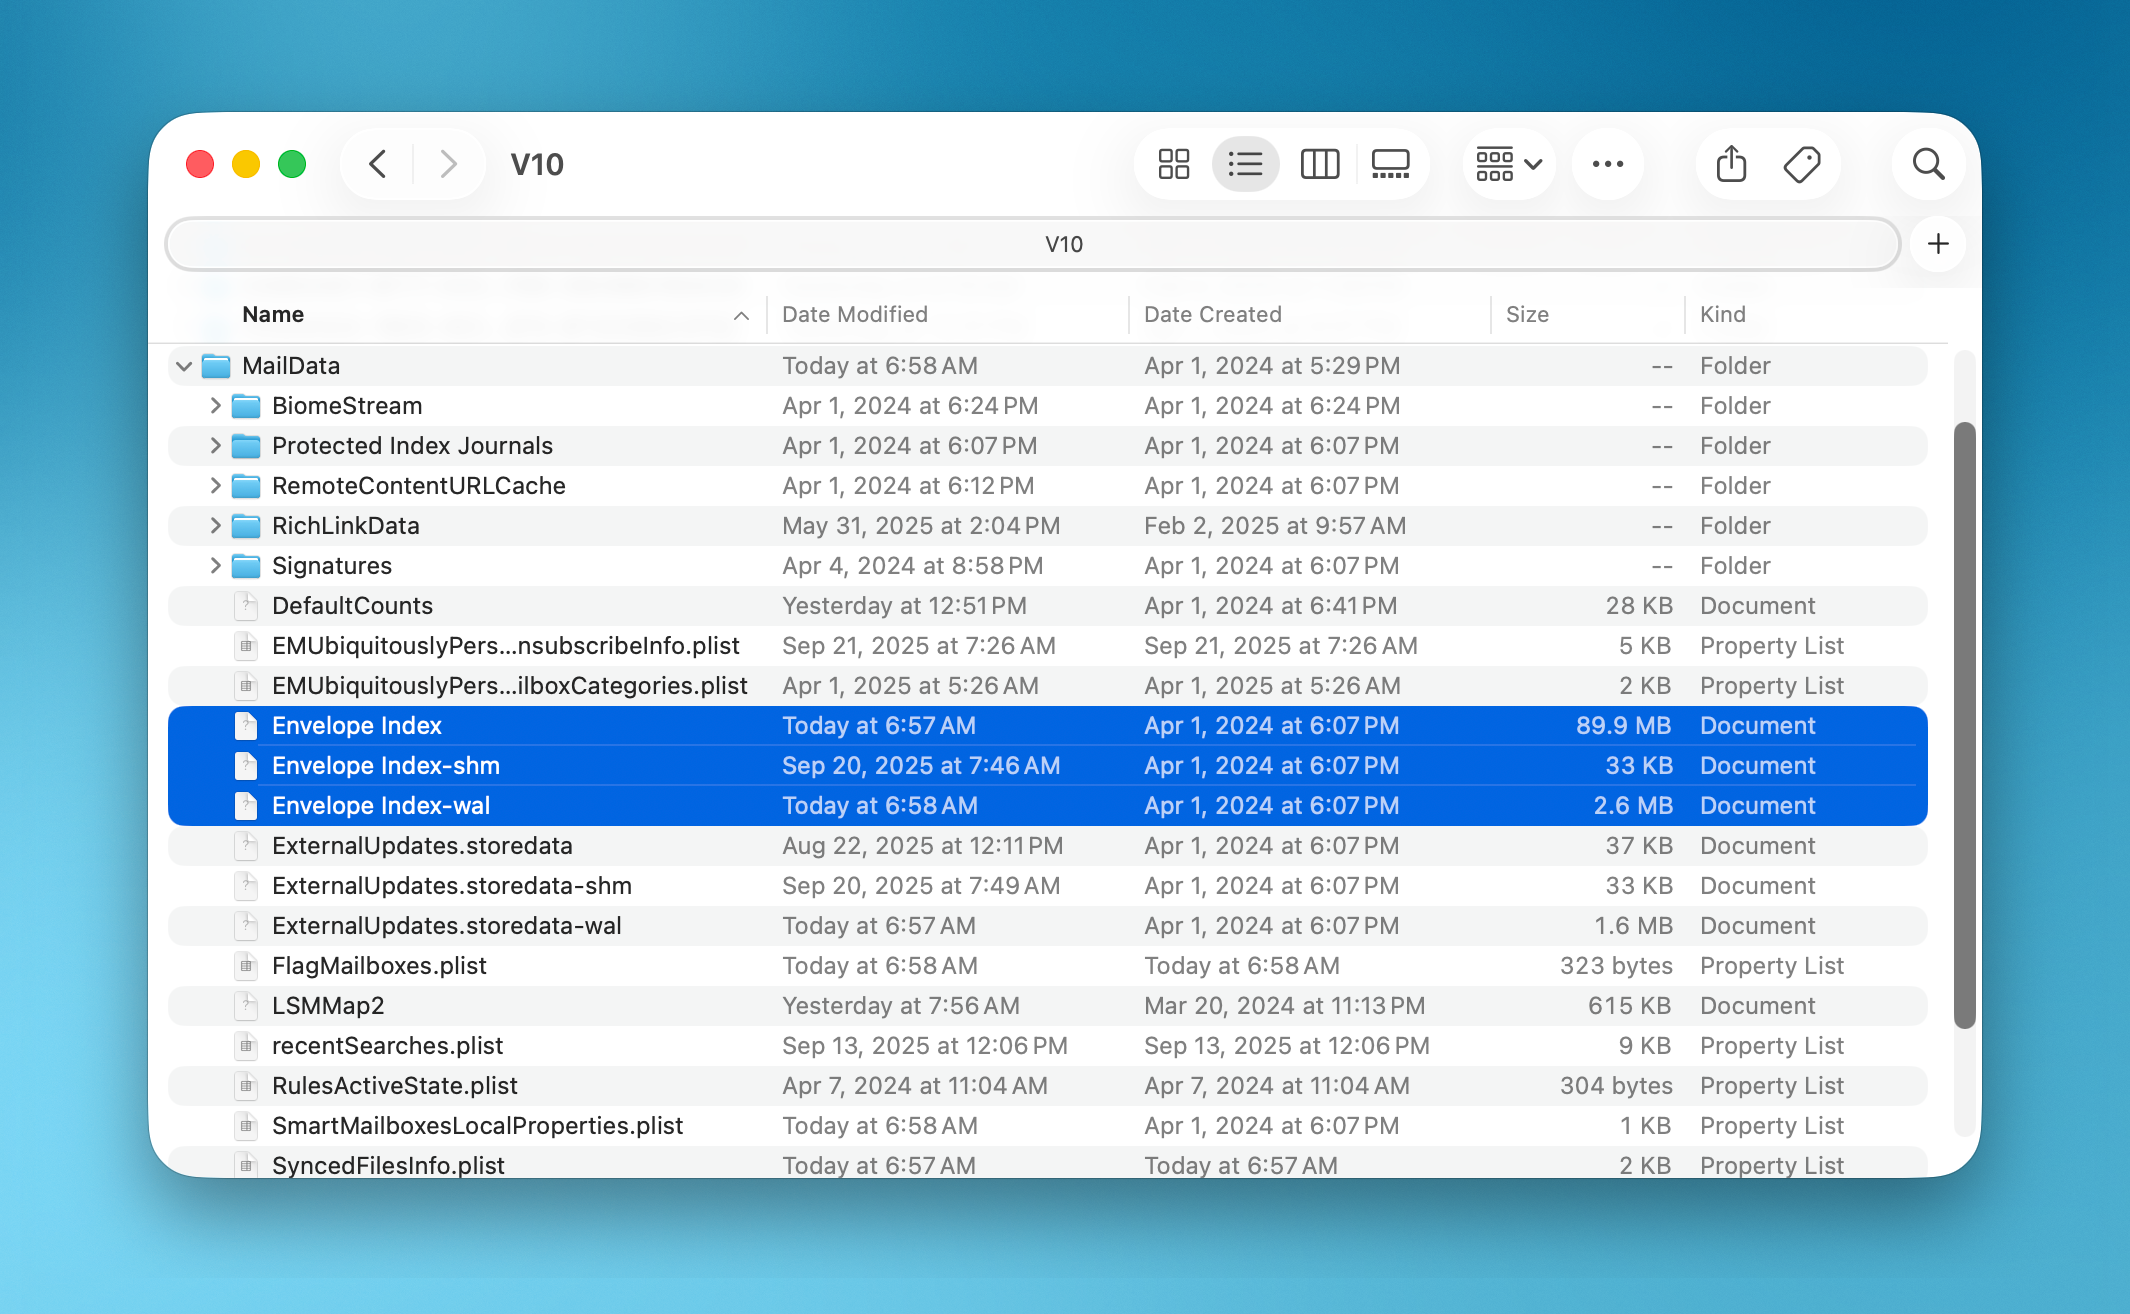
If you’re experiencing the same problem, here’s a very simple fix to rebuild the Apple Mail envelope index.
First, quit Apple Mail if it’s running, then navigate your way to ~/Library/Mail/ (where “~” is your home folder) in the Finder. Once you’re in the Mail folder, you’ll see a file named “Envelope Index” which keeps track of where all messages are located. Rename “Envelope Index” to “Envelope Index Backup” (We don’t want to trash the file just yet).
Then, relaunch Apple Mail. You’ll be presented with a daunting “Message Import” dialog that looks like your email account was wiped out and you’re starting all over. Fear not. You’re simply rebuilding the Envelope Index at this point.
Click “Continue” to rebuild the index. Once it’s done, all those pesky phantom messages will be gone the next time you perform a search in Mail (Yay!). You can then go back to the ~/Library/Mail/ folder in the Finder and move the file you renamed to “Envelope Index Backup” to the Trash.
And there it is. Your Apple Mail Envelope index has been rebuilt. A very simple solution to a problem that has baffled some of the best Mac users.